Media Set
If media variables are present in any of the columns of the input data table, a Media Set button will appear to the right of the Point Color button. Media files are broadly defined. We currently support viewing various image formats, videos, and STLs (geometry files for a 3D printer). Each media variable in the input data table consists of a column with a shared file type, though blank entries are permitted within a column (i.e. not all ensemble members are required to have an image or video for media viewing to be used). Typically, the files in a column share a common theme, such as images showing the final state of a simulation, or an event-triggered animation, or the geometry of a specific part at a specific time. In all cases, a media file is described by a URI that provides a full path to a source file. Each URI must have the format: file://machine_name/absolute_directory_path/filename.ext.
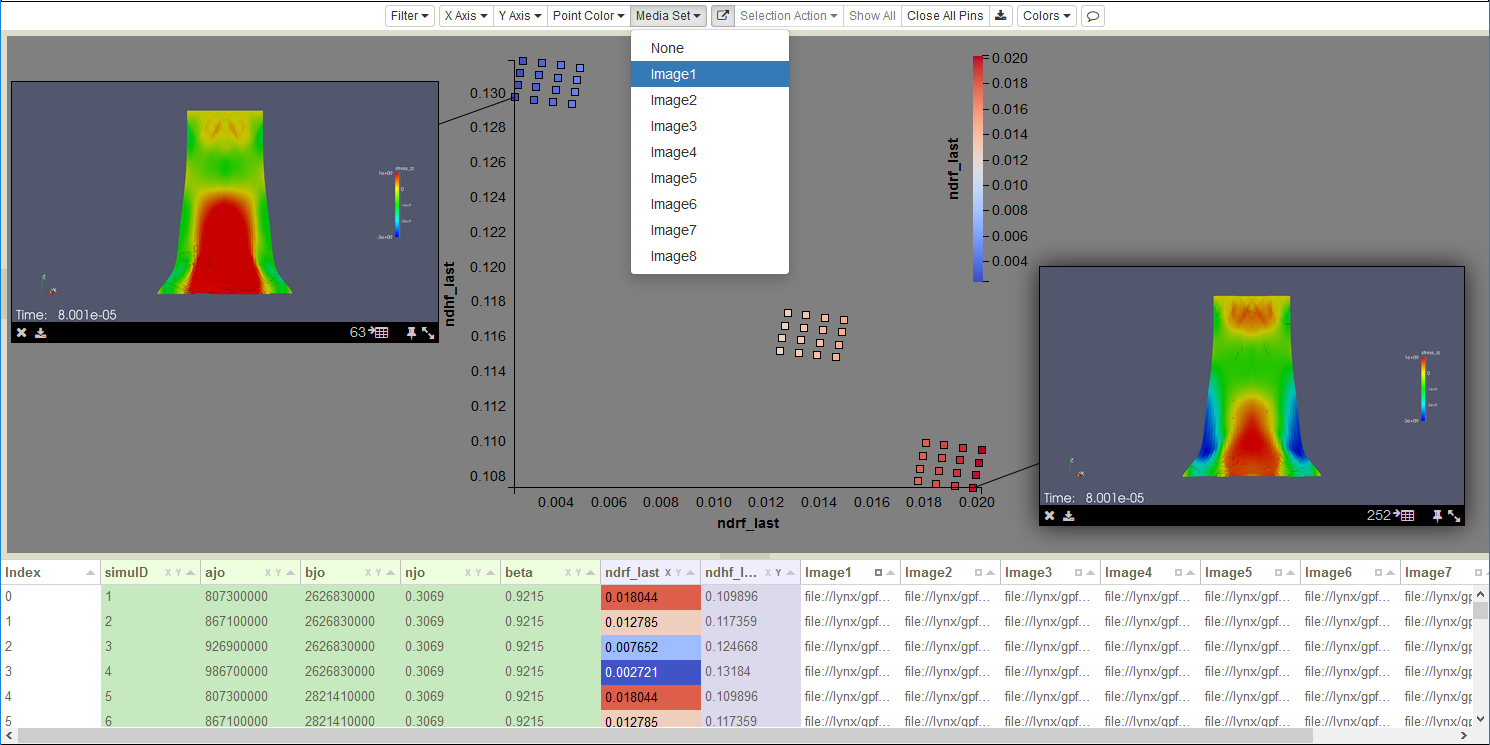
Figure 38: Media Set Selection of Image1.
Initially, media retrieval is disabled because the Media Set selection is set to None. Once a media variable has been selected, hovering over a scatterplot point will retrieve that point’s remote media file as defined by the URI. For the first remote access, authentication will be required. Hovering provides a convenient means for rapidly examining and comparing outputs generated by in situ visualization codes, such as Catalyst and SpyPlot. Viewers can be repositioned within the scatterplot by dragging. Each viewer is connected to its associated point in the scatterplot by a line, one end of which always tracks the viewer position (see Figure 38). For videos and STLs, the viewers include interaction controls (e.g. play buttons, or rotation axis selectors).
As with Point Color, there are two mechanisms for selecting which Media Set variable to display. Either select a variable in the Media Set dropdown list, or click on the small square to the right of the variable name in the Variable Table column header. The two mechanisms are linked, so regardless of which one is used, the selection is shown in both. As seen in Figure 38, the selected variable name (Image1) is highlighted in the dropdown, and the square to the right of the variable name is darkened in the column header. Once the selection is changed, hover will reference the new column’s URIs when retrieving remote files, but currently visible images will not be affected. This allows you to compare different media variables from one or more simulations. Selecting None (the first choice in the dropdown list) disables the hover response.
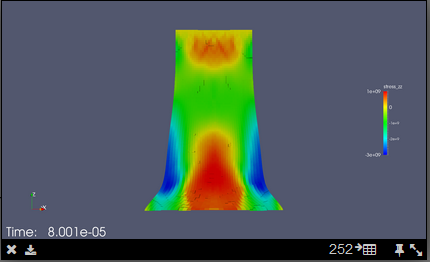
Figure 39: Image viewer with close, download, index row, pinning, and resizing icons.
The viewer in Figure 39 shows the set of standard viewer icons in the strip across the bottom of the image. From left to
right, each viewer has a close icon  , a download icon
  , an index row icon
  , a
pinning icon
, a
pinning icon  , and a resize icon
  . Viewers remain visible while the mouse remains within the viewer
boundaries. Either clicking on the icon, resizing, playing a movie, or moving the viewer acts to pin the viewer
in the scatterplot. A pinned viewer remains visible until your explicitly close it, either by clicking its
icon, or by simultaneously closing all pinned views using the Close All Pins button. To simultaneously retrieve and pin
media for a group of points, first select the points, then select pin in the Selection Action dropdown list. Using the
icon within a viewer both pins and shrinks it to a standard thumbnail size. For arbitrary viewer sizing, press
and hold the left mouse button on the icon while dragging the corner. To download a copy of the media object
to your local machine, click the icon.
. Viewers remain visible while the mouse remains within the viewer
boundaries. Either clicking on the icon, resizing, playing a movie, or moving the viewer acts to pin the viewer
in the scatterplot. A pinned viewer remains visible until your explicitly close it, either by clicking its
icon, or by simultaneously closing all pinned views using the Close All Pins button. To simultaneously retrieve and pin
media for a group of points, first select the points, then select pin in the Selection Action dropdown list. Using the
icon within a viewer both pins and shrinks it to a standard thumbnail size. For arbitrary viewer sizing, press
and hold the left mouse button on the icon while dragging the corner. To download a copy of the media object
to your local machine, click the icon.
Note that Slycat™ video functionality is not available for all movie formats. In fact, due to technical issues related to our web-based delivery, videos must be created in a very specific way to be viewable in Slycat™.
Video Source Files
There is no standardized support for videos between browsers. We have found that the h264 codec in combination with an mp4 container format is compatible with Firefox, Chrome, and Safari on both Windows and Mac platforms. In our testing, we have found that initial key frames are frequently lost, rendering the following compressed frames useless. This requires explicit key frame forcing during movie creation. We use the ffmpeg utility to convert images into videos. Make sure that your version of ffmpeg was built with the h264 library, since some versions of ffmpeg don’t include this codec by default.
If you are within Sandia, we provide this custom version of the library on the cluster machines. You can generate Slycat™ compatible movies as follows:
> module load slycat
If your images are PNGs, they must be first converted to JPG format (ffmpeg won’t complain about the input images being PNG, but the movie that it generates won’t play). If you already have JPG images, skip this step:
> mogrify -format jpg myImageName.0*
This last step generates the mp4. Don’t forget to enclose the image path in single quotes:
> ffmpeg -pattern_type glob -i '/someDisk/someUser/someDirectoryPath/myImageName.0*.jpg' -force_key_frames 0.0,0.04,0.08 myMovieName.mp4