Projects
Project-specific information consists of the project name, a list of project members, a set of models, and a set of saved bookmarks for models within that project.
Project Creation

Projects are created by clicking the green Create button on the main Projects page and selecting New Project from the dropdown that appears. A dialog will pop up, providing editable regions for you to enter a Name and an optional Description. This brief text field allows you to provide more detailed comments or notes beyond the project name. Clicking the Finish button in the lower right corner creates the project and takes you to the newly created project page; clicking the Cancel button in the lower left corner aborts project creation.
Once the project is created, you will find yourself on the empty project page. As the project creator, you are automatically assigned the role of Administrator for that project (although there can be multiple project members with Administrator roles). A series of buttons appears to the right of the project name. Since you have an Administrator role, there will initially be four buttons: Create, Edit, Info, and Delete. Only project administrators can edit or delete the project. Otherwise, there will only be two buttons: Create and Info.
Editing Projects

Clicking on the yellow Edit button on a project page and selecting Edit Project from the dropdown list provides a means to change the project Name, Description, or project Members. An Edit Project popup will appear with the current project information (Figure 6). In a newly created project, the membership list consists solely of the project creator assigned the role of Administrator. The username of the creator will be shown within a red button (buttons are color-coded according to role and red is used for an Administrator) at the bottom.
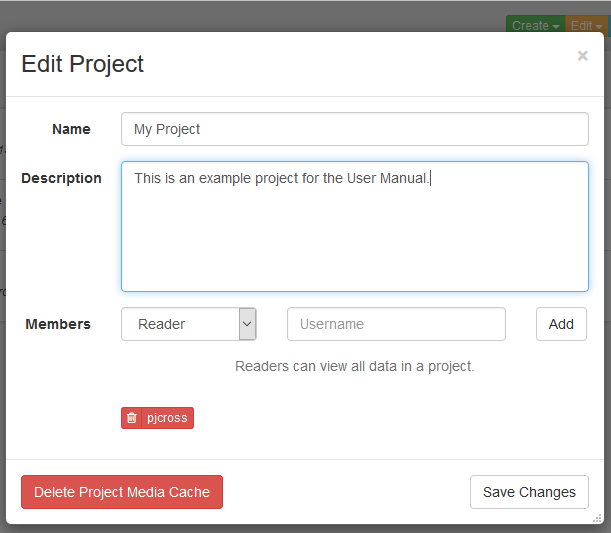
Figure 6: Edit Project dialog allows you to change the project name, add or change a description, and add, remove, or change the roles of project members.
There are three different roles that project members can have: Reader, Writer, and Administrator, whose buttons are color-coded blue, yellow, and red, respectively. Readers can view all data in a project, but they cannot create new models, modify existing models, or delete models. Writers can both view and modify the contents of a project, but they are unable to add new project members or edit the project name or description. Administrators have full access to all aspects of the project, including adding new project members or deleting the project itself.
To add a project member, select a role from the dropdown list to the right of Members and type in the person’s username. Note that the username is checked against a list of legitimate usernames and will be rejected if it is not found. If the username is found, a popup will translate the username into the person’s full name and verify both the identity and the role selected. Click OK if both the person and role are as you intended, or Cancel if they are not. Now an additional button, color-coded by role and enclosing the newly added member’s username, will appear in the member list below. Although the new member now appears to be in the project member list, this action has not been saved and will be discarded unless the Save Changes button is pressed.
To remove project members, click on the trashcan icon next to the name of the member to be removed. To change the role of a project member, add them as you would a new project member (you do not need to remove them first), but with the revised role. Note that as an Administrator, you have the power to delete yourself or reduce the level of your role (thereby losing your Administrator privileges), which is why we require you to first click the Save Changes button before we finalize any changes. If you find that you have accidently made a change that you do not want to execute, pressing the X button in the upper right corner of the Edit Project dialog cancels the edit and keeps the previous project state (Name, Description, Members, and member roles) intact.
Project Info
To see a non-editable version of a project’s information, click on the cyan Info button on the project page and select Project Details from the dropdown. A popup will display the Name, Description, and project Members list. Click Close when you are finished viewing it. Note that this same information can be seen by hovering over the project name in the breadcrumb navigation path.
Deleting Projects
To remove a project, including ALL ITS MODELS AND DATA, click the red Delete button from within the project page of the project that you wish to delete. Select Delete Project from the dropdown. Note that only members with Administrator rights may delete the project. Project deletion is an irreversible operation, so deletion requires confirmation through a popup that asks if you really want to delete that project and all models within it. Press the red Delete Project button to confirm deletion, or the X button in the upper right corner of the dialog to cancel the operation and keep the project.